Please ensure Javascript is enabled for purposes of website accessibility

New Online Options Available Now Learn More

Order Warranty

Category: Homeowner Tips

Without a little TLC, your dishwasher can fall prey to unexciting repairs. There are a few things you can do regularly to help maintain your dishwasher and avoid unnecessary repairs. faucet
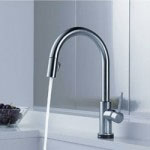
1. Run hot water before starting the dishwasher. Before beginning the dishwasher cycle, run your water from your kitchen sink until it is hot to the touch.  This will enable your dishwasher to have hot water instantly, instead of cool or lukewarm water.  Hot water will help improve the performance of your dishwasher and the cleanliness of your dishes.     dishwasher
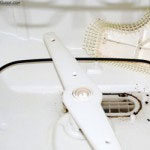
2. Clean your dishwasher trap Under the lower sprayer of most dishwashers you will find the dishwasher trap. The lovely thing collects all of the food, plastic and other materials that get left to prevent them from entering the drain. Cleaning the trap helps keep smells down and increase the cleanliness of your dishwasher.   dishwasher2
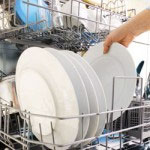
3. Clean your dishes before placing them in the dishwasher For your dishwasher to run its best, you need to do more than barely scrape the food off your plates. Try to give your dishes a gentle cleaning before placing them in the dishwasher. Any particles that remain get stuck in the dishwasher trap and lower the performance of your dishwasher. For a little extra help in the upkeep of your dishwasher, be sure to order a home warranty. The Platinum warranty plans cover dishwasher breakdowns due to normal wear and tear.]]>

To fix it or not to fix it?  That is the question.  Home appliances can be pretty expensive and once you have invested in them, you want them to last for a while.  Every appliance has a different lifespan and certain appliances tend to last longer than others depending on how often they are used and for what they are used.  But, inevitably, appliances will break down at some point.  And when that time comes it is hard to know whether it will be worthwhile to invest in repairing the appliance or whether you should fork over the cash to purchase a new appliance.  One way to protect yourself from having to spend exorbitant amounts of money on new appliances anytime they break is to invest in a home warranty.  Depending on the home warranty you choose, many of your appliances will be covered under the home warranty and a repairman will be sent for a nominal fee should a problem occur.  This protects you against having to invest in a brand new appliance which can be very costly.  Below we discuss how to know whether it is better to repair or replace an appliance so that you can make the best decision should the need arise. Know how long appliances typically last when well cared for.  For example, Houselogic notes that, on average, dishwashers last 9 years, garbage disposals last 12 years, washers last 10 years, dryers last 13 years, refrigerators last 13 years and cooking ranges last 13-15 years depending on whether they are gas or electric.    Knowing this will help you have a basic knowledge of what to expect from your appliances. If a break or problem occurs with an appliance and it is still relatively new you may want to repair but if it is getting older it may not be worth investing the money in a repair.  The return on your investment will likely be minimized by its lifespan and you will end up spending a lot of money soon after on a new appliance.  In regards to this, Houselogic also discusses what they refer to as the “50%” rule as a guidepost for consumers to follow, ” In 2014, the average cost to repair an appliance was $254 to $275. Should you pay it?  If an appliance is more than 50% through its lifespan, and if the cost of one repair is more than 50% of the cost of buying new, then you should replace rather than repair.  To do the math, you’ll have to know the typical lifespan (see above), and get a repair estimate. Most service companies charge a “trip charge” to diagnose the problem. These charges vary widely, so be sure to ask when you arrange the appointment.  If the company repairs the appliance, the trip charge typically is waived.” Consider what is cost-effective.  This is not simply related to comparing the cost of repairing vs. the cost of replacing.  It is also related to energy efficiency.  After all, a 10 year old refrigerator is likely far less energy efficient than a newer model.  Rather than spending money to repair a refrigerator that will cost a lot in monthly energy bills and break fully in a few years it may be the better choice to choose to upgrade now.]]>

Drip, drip drip…..Nothing is worse than suddenly realizing that you have a leak and wondering just how long it has been happening.  A leak is not simply a nuisance but it could be the sign of a larger problem and could cause major damage.  But, life gets busy and depending on how much time you spend at home a leak could go unnoticed.  It is important to deal with a leak immediately so below we make note of the three most common home water leaks so that you can keep your eyes peeled for potential problems and address them should they occur.

  • Washing Machine
The washing machine is a handy appliance that most households today have.  But, that handy appliance can quickly turn into a hazard if a leak occurs.  And, unfortunately, leaks do often occur with washing machines.  Many washing machine problems start at the back of the machine, near the valves or hoses.  Over time, hoses can wear out from constant use and pressure.  Additionally, the movement of a washing machine may compromise crucial fixtures and cause breaks or corrosion over time.  If you notice a small amount of water at the front of a front loading washer there could be an issue with the seal on the door.  But if you notice a larger amount of water from underneath the washer or from the back, it is time to pull out the machine and look for visible problems.
  • Faucet
Faucets are used with great frequency and thus are more susceptible to leaks over time.  With many small moving parts, a leaky faucet is often the result of things simply getting a little loose.  A slowly dripping faucet may seem like no big deal but it will waste a significant amount of water and money over time.  As soon as you notice the slow drip of water every two or three seconds it is time to repair your faucet. There are a few different kinds of faucets d each type has their own repair method.  If you are unfamiliar with tools or plumbing repairs it is best to rely on a home warranty who can quickly and easily repair your faucet and keep your home functioning properly.
  • Toilet
A toilet leak may sound like messy or gross business but often it is quite similar to other leaks.  It can be caused by the flushing of the toilet and the movement that results and makes the toilet move against the pipe that is connected to the wall.  But, the most common toilet leak can be hard to spot or notice because it often occurs in the tank and out of sight.  The water level in the tank should exceed one inch below the top of the tank and if it does there is a leak that is causing the tank to fill up.  Additionally, the flapper valve can become warn out over time and cause water to leak into the bowl from the tank.  There is a simple way to check if you have a flapper leak – place a dye tablet or few drops of food coloring in the tank.  If you see the color in the toilet bowl within 15 minutes you know that you have a flapper leak.  As with any other leak, if you do not have plumbing experience or the proper tools, allow a home warranty to protect you and arrange for the proper repairs of plumbing in your home.]]>

Your home is likely one of the biggest investments you will ever make. It is for this reason that it is imperative to properly maintain your home. By doing so, you keep your home functioning as it should and prolong the life of fixtures, features and appliances. Regular home maintenance can be as basic as the usual “spring cleaning” tasks and as involved as changing filters, touching up paint and more. Not all things will needed to be done all the time, but completing as many of them as possible will help your home be prepared as the cold begins to thaw and beautiful spring temperatures arrive.

  • Start Outside
Through the harsh and cold winter, the exterior of your home has likely taken the brunt of the winter beating. Take a slow walk around your home and look for obvious problems such as cracks in the caulk or problems with the seals on the windows or doors. These things tend to occur over time but cold winter temperatures can speed up the process and cause them to wear out more quickly. Additionally, look for damage to the paint from harsh weather. Check the gutters and clear dirt and debris. During the fall and winter leaves and other debris often collect in the gutters and with snow and water from rain, clogs can happen. By clearing them, you will protect your home from damage due to clogs in the gutter. After examining the exterior of your home, it is time to examine the rest of your property.
  • Look Around Your Property
It is highly likely the cold temperatures have not been friendly to your plants. Trim them back so that the damaged areas are gone and new, fresh growth can occur. Rake the leaves and give the lawn a fresh trim as well. Check for any damage to walkways or paths and repair them because they could be hazardous to you and your guests and the last thing you want is anyone to trip and injure themselves. Next, clean off your grill and the area around your grill so that you can cook out while enjoying the new pleasant weather. It may not be quite time to plant new plants but by repairing your yard and lawn it will be ready for it when the time comes.
  • Move Inside
While the outside may take a harsh beating in the cold winter weather the inside does not get away unscathed. Throughout the holidays and cold temperatures, it is likely you have spent more time inside and that means the inside has seen more wear and tear. To begin, if you have neglected your air filters during the winter months, it is important to change them so that as you begin using your HVAC system for air conditioning as the temperatures rise it can be as energy efficient as possible. Just as you did with the outside, check all windows and doors to ensure the seals are intact. Dust the ceiling fan blades that tend to collect dust and then distribute it back into the room. Spring tends to bring allergies for many so this is one way to help reduce allergens in your home. Additionally, it is wise to check your smoke detectors in your home often to ensure they are working properly and replace batteries should it be necessary.]]>

Laundry rooms tend to be one of those “catch all” locations where everyone drops all of their things and laundry accumulates as well. It does not take long for a mountain of random articles of clothing and other items to grow into a disorganized mess in the laundry room. While you may not be sitting down in your laundry room to eat dinner or enjoy a movie you will spend time in there and as another room in your home it deserves attention and organization so that you can enjoy your time spent in it.

To begin with any organizational project, it is important to start with a clean slate so first remove everything from the room o that you can see what you are working with. Some laundry rooms are barely the size of a closet while others are spacious – no matter the size, there is always a way to be more organized and efficient so that you can make the most of your laundry room. Once the room has been emptied, take stock of what you have and what you intend to store in the room. This will be an important factor in determining what organizational items you need to purchase.

Once you are organized it is time to purchase and gather your organizational items. Depending on your budget, one wonderful option is to install cabinetry in your laundry room. There are a wide variety of options to fit almost any budget. You can purchase pre-fabricated cabinetry from your local home improvement store and have them installed or install them yourself the same day. If you prefer the look of shelving to cabinetry, you may want to purchase an assortment of baskets or bins to help you organize your laundry room essentials. They can be plain and simple or they could be stylish to match your home decor. Just because your laundry room is utilitarian does not mean the style of the room has to be. One way to add form to function is to choose organizational items that double as home decor. In addition to bins, use things like canisters or glass jars to organize things like laundry detergent or other odds and ends. Putting your laundry detergent in a cute canister or container will only take a moment and may seem unnecessary but it is just one more way to reduce the industrial look and add style. Additionally, consider installing things like a drying rack or ironing board. By doing so, you keep things form ending up scattered all over the place or throughout the house. Everything can be accomplished in one room which will help your whole home stay more organized.

When it comes to keeping your home looking its best and in proper working order, there are few things more important than regular home maintenance.  Home maintenance helps prevent major repairs that are expensive, time consuming and downright frustrating.  But, time tends to fly and often, we neglect proper regular maintenance because life just gets in the way and we forget.  It can be difficult to remember the last time we checked the smoke detector batteries but doing so is important.  To help remember what needs to be done, having a monthly checklist will help you ensure you are getting things done routinely and nothing is being neglected. Clean the Gutters As temperatures drop and leaves fall, gutters tend to get clogged.  Dirt, debris, and leaves get caught in the gutters and as rain falls, it can divert water towards your home instead of away from it.  Water being directed toward your home is the last thing you want, and if temperatures drop enough, the backed up water could also freeze.  Clean the gutters so that you are ready for cold winter temperatures. Change Your HVAC Filter When filters do not get changed regularly, it forces your HVAC system to work harder which shortens the life of your HVAC system and also leads to higher energy bills. Adjust the Thermostat As temperatures cool down, it is time to adjust your thermostat for energy efficiency.  Rather than running your heater all winter long, around the clock, consider adjusting the thermostat by two or three degrees.  By adjusting it just a few degrees and wearing warmer layers, socks or throwing an extra blanket on the bed to keep warm, you could save a significant amount of money. Prepare Guest Rooms If your guest rooms have gone relatively unused during the summer months, it may be time to give them some extra freshening up before holiday guests arrive.  Wash linens and clean the room thoroughly so that your holiday guests are welcomed nicely into your home. Close Vents If you have rooms that will go unused during the winter months, close the vents in those rooms.  Rather than heating a room that no one is in, conserve energy by closing vents and directing warm air to other rooms in the home. Trim the Trees Trim long tree branches back before cold temperatures arrive. Trimming them now will help prevent problematic breakage during winter weather.Check for Leaks and Seal Inspect windows and doors for leaks.  If you can see visible leaks or air appears to be escaping through cracks, seal the cracks.  You are paying for all that hot air in your home so you do not want to waste money by letting it escape through cracks and gaps.  Sealing is incredibly simple and supplies can be bought at any local hardware store. Test Smoke Detectors Fall and winter holiday season is notorious for being a dangerous fire season.  More home fires occur during the holidays than any other time during the year.  Check every smoke detector in your house to ensure they are working and replace batteries as needed.]]>

As the temperatures drop and fall is upon us, it is time to transition our home decor from a summer feel to a more warm, fall aesthetic.  You do not need to completely remove everything though, there are way to transition your existing decor from one season to another with style.   With the natural change of color outdoors, it is nice to transition the overall feel and color scheme indoors accordingly.  Warming up the inside of your home can be done on any budget.  It is not necessary to decorate your home from floor to ceiling with pumpkins and fall leaves, you can add beautiful, cozy accents throughout your home that say “fall” without turning your home into a harvest festival. 1. Fall Wreath

It is festive and inviting to have a seasonal wreath on your door.  There are many available in home decor and craft stores and you can also make your own.  If you are feeling particularly crafty, take a look at Pinterest for inspiration on how to make your own fall wreath!  It is a fun a personal way to say that your home is ready for the change of season and will warmly welcome guests inside.

2. Pumpkins

Bring a little of the outdoors inside with natural items like pumpkins and flowers.  Fresh or faux, it does not matter!  There are beautiful orange pumpkins if you want to be traditional and painted pumpkins to match any style of decor.   They look great on the ground next to a potted plant or if you find some small pumpkins they look wonderful on the counter as well.

3. Flowers and Branches

Fall flowers, leaves and branches are a warm addition that are easy to transition in and out of any existing decor in any home.  If you have a vase that had some vibrant sunflowers for the warm summer months, when fall arrives, simply change them out for some flowers, leaves and branches that exude fall colors like autumn red and burnt orange.  A beautiful fall centerpiece will make a lovely addition for a fall dinner party or house guest.

4. Use Items that Transition to Winter Easily

Things like branches, pinecones, dried berries and more will transition nicely from fall to winter.  This way, they do double duty and make it easy for you when it comes time to decorate for the winter months.

5. Throw Blankets and Pillows

One easy way to quickly change the look and feel of your decor without completely replacing your furniture is to add pops of color or style for the season with fall throw blankets and pillows.  Whether it is the color, weight or pattern of these items, a fall throw blanket or pillow will immediately change the decor from summer to fall.

6. Use Jars

Small vases, mason jars or large hurricanes can be filled with seasonal decor to create a fun addition to the space.  This is an inexpensive (or free!) way to decorate for the season.  You can purchase vase filler at most home decor or craft stores or you can head outside and collect fall leaves, branches, acorns, pinecones or other natural elements to give your table that warm fall flair.  When fall is done, remove the filler and transition it to winter filler.

]]>

Have you grown tired of your kitchen?  For many, the kitchen is the heart of the home and many hours are spent  cooking and enjoying time together.  For those that love to entertain, the kitchen is not simply a place to cook, but a place to prepare meals for gatherings and warmly invite guests into your home.   If your kitchen is outdated or you just no longer enjoy it’s look for functionality, you may be considering an update.  There are many home renovation shows on television that show contractors gutting kitchens completely and starting fresh.  While this may sound fun, it is also tends to be very expensive.  One way to get a high end feel with your new look is to pick one item on which to splurge.  If there is one thing you have had your eye on (a new range hood, a new farmhouse sink, etc.) budget for that one special splurge and stick to a tighter budget when updating the rest of your kitchen.  But, you can give your kitchen an updated look and facelift on a budget and still enjoy a complete transformation without emptying your bank accounts.

1. Update Lighting Fixtures

You do not need to spend thousands of dollars on a new chandelier or pendant lighting.  There are lighting fixtures for every budget and every design aesthetic.   The impact of new lighting can be very significant and will help set the mood for the room.

2. New Hardware

While you may think adding new hardware or updating existing hardware will hardly be a noticeable change, you will be amazed at just how big of a change it will be.  Outdated hardware can really put off the wrong feel in a kitchen.  Some cabinetry is classic and in perfectly good condition but the hardware is out of style.  Rather than completely gutting your cabinetry, give it a facelift with new hardware and stand back in awe of how good the update looks.

3. Replace Faucet

Faucets may seem like something that never really changes over the year but, in fact, they change quite a bit.  If you have not updated your faucet in many years, it may look outdated or just be boring.  These days, there is a faucet design for every home design aesthetic.  Let your faucet design blend seamlessly with the rest of the room or enhance the existing look.

4. Refinish Cabinetry

Buying all new cabinets for your kitchen will look beautiful but they will cost a lot.  If you are trying to stick to a tighter budget, there is probably not enough money to purchase all new cabinetry.  But, if your kitchen cabinetry is in relatively good shape, consider painting it or staining it.  Sometimes, it is the stain that is looking worn out, outdated, or is just not the color direction you want to go with your new kitchen.  You would be amazed at what some paint or stain can do.  It will give your kitchen cabinetry a new life and, in many cases, a completely new look.

There are few things more beautiful than hardwood flooring in a home.  It is timeless and adds a natural elegance and sophistication to any home.  There are a vast amount of finishes, widths and styles when it comes to hardwood flooring and it can truly be selected in any design to fit any decor aesthetic.  Because hardwood flooring is so popular in so many homes, homeowners are looking for the best ways to care for those hardwood floors.  After all, purchasing hardwood floors is no small investment and in order to best protect your investment, you need to take good care of your floors.  Caring for hardwood flooring is different than caring for other types of flooring like ceramic tile or laminate.  Follow the hardwood floor care tips below and keep that beautiful flooring in perfect condition. 1. Prevent Dirt From Being Tracked Inside

Place mats outside of all exterior doors.  By ensuring that those entering your home have to step on the mat first, it will help reduce the amount of dirt that gets tracked inside on a daily basis.  One of the most common frustrations of those with hardwood floors is that it constantly shows dirt but by reducing how much can actually be tracked in, it will save you a lot of frustration.  Additionally, if you ask your family to take their shoes off at the door when they come home this will also help reduce the amount of dirt that gets tracked in.

2. Determine Finish Before Cleaning

You need to determine the finish because the finish will help dictate your cleaning methods.  If your floor is sealed, a few drops of water will stay on the surface but if it is not sealed, the water will soak into the floor.  Most newer hardwood flooring is surface-sealed with a protective coating that will help prevent stains and water damage.  Surface-sealed floors simply need to be swept and mopped and they are clean.  For penetrating-seal treated or oil-treated floors they need to be cared for more carefully and need to be waxed to properly protect them.

3. Clean Spills Immediately

Just a few drops of water?  No big deal?  Wrong.  Clean any and every spill as quickly as possible to prevent damage from happening.  Hardwood floors are very susceptible to damage so work hard to protect your investment by quickly cleaning spills before they can leave a mark or, with bigger spills, warp beams.

4. Protect Your Hardwood

Protect your hardwood flooring with area rugs and felt pads under the legs of furniture.  Scuffs, scrapes and even permanent marks can be left in the wood from furniture being moved around or from people walking in high heeled shoes.  Protect high-traffic areas with different sized area rugs so that your flooring is not damaged.

5. Bring In The Professionals

When in doubt, it is always a good idea to let the professionals take care of your floors.   Professionals will be able to help properly clean and protect your flooring so that you avoid permanent damage and keep your floors looking as beautiful as the day they were installed.

]]>

The garbage disposal is an incredibly helpful household appliance that most of all take advantage of.  It reduces the amount of food that you have to throw in your trash which helps cut down on how many trash bags you use and helps reduce odor for the trash can.  But, any garbage disposal that gets used with some regularity is bound to start to smell a little from time to time.  And once that garbage disposal starts to smell, you will notice it when you wash dishes and spend any amount of time in your kitchen.  If you do not do some work to clean your garbage disposal, that smell will stick around and keep bothering you.  Your garbage disposal may seem like a dark place where you cannot really see what is happening so how exactly will you clean it?  But, there are some very easy ways to clean your garbage disposal and keep those nasty odors away.

1. Prevention is Key

You can help avoid odor from accumulating in your garbage disposal by avoiding putting the wrong things down the drain.  Never put things that are not biodegradable down the drain and never put any liquid grease down the drain.  Liquid grease will cool and harden which will cause clogs.  Foods like bread or pasta will absorb water and expand, also causing clogs.

2. Use Cold Water

Turn on the cold water and the garbage disposal and let them run.  It is best to use cold water and let the water run for 30 seconds after you turn the disposal off.  Often, the odor comes from food particles that have been crushed up adhering to the walls of the garbage disposal and eventually starting to smell.  Many times, by running the water and garbage disposal for a minute or two you can get rid of that bad odor.

3. Use Citrus

The peelings from a lemon or orange work wonders when put down your garbage disposal.  The garbage disposal will grind up the peels and they will release their naturally wonderful smell while also helping to clean the blades.

4. Ice Cubes

Grind up some ice cubes in your garbage disposal.  The ice cubes will help remove built up food particles and will sharpen the blades as it grinds.  To give the ice a boost, pour some dish soap in while it is grinding and it will give it some extra cleaning power.

5. Vinegar & Baking Soda

If those pesky odors are still sticking around, some common household items will get that garbage disposal clean in no time.  Pour 1/2 cup – 1 cup of baking soda down the drain and then pour 1 cup of white vinegar down the drain.  Let it works its magic for about 30 minutes and then run  some water down the drain to clean everything out.  The baking soda and vinegar will loosen tough, dried on food and other debris and the water will rinse it all away.

6. Bleach

When all else fails, pour a mild bleach down the drain while cold water is running and the bleach will also help loosen food particles and clean the disposal and pipes.